
Introduction
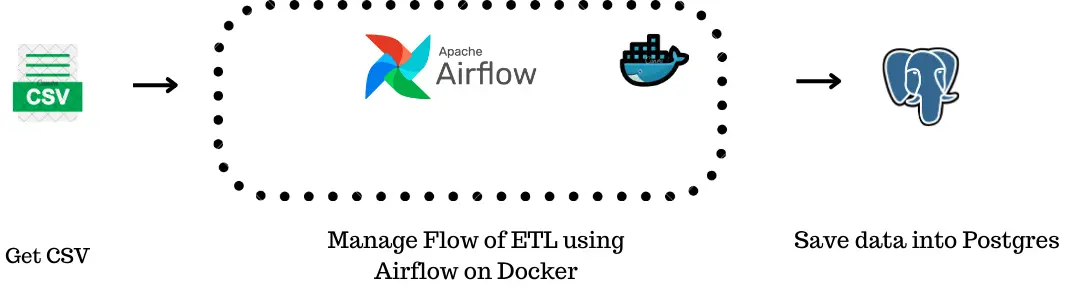
Managing a data pipeline, such as transferring data from CSV to PostgreSQL, is like orchestrating a well-timed process where each step relies on the previous one. Apache Airflow streamlines this process by automating the workflow, making it easy to manage complex data tasks.
In this article, we’ll build a robust data pipeline using Apache Airflow, Docker, and PostgreSQL PostgreSQL to automate reading data from CSV files and inserting it into a database. We’ll cover key Airflow concepts such as Directed Acyclic Graphs (DAGs), tasks, and operators, which will help you efficiently manage workflows.
The aim of this project is to demonstrate how to create a reliable data pipeline with Apache Airflow that reads data from CSV files and writes it into a PostgreSQL database. We will explore the integration of various Airflow components to ensure effective data handling and maintain data integrity.
Learning Outcomes
- Understand the core concepts of Apache Airflow, including DAGs, tasks, and operators.
- Learn how to set up and configure Apache Airflow with Docker for workflow automation.
- Gain practical knowledge on integrating PostgreSQL for data management within Airflow pipelines.
- Master the process of reading CSV files and automating data insertion into a PostgreSQL database.
- Build and deploy scalable, efficient data pipelines using Airflow and Docker.
Prerequisites
- Docker Desktop, VS Code, Docker compose
- Basic understanding of Docker containers
- Basic Docker commands
- Basic Linux Commands
- Basic Python Knowledge
- Building Image from Dockerfile, Docker-compose
This article was published as a part of the Data Science Blogathon.
What is Apache Airflow?
Apache Airflow (or simply Airflow) is a platform to programmatically author, schedule, and monitor workflows. When workflows are defined as code, they become more maintainable, versionable, testable, and collaborative. The rich user interface makes it easy to visualize pipelines running in production, monitor progress, and troubleshoot issues when needed.
Understanding Airflow Terminologies
Let us understand the airflow terminologies below:
Workflow
- Think of a workflow as a step-by-step process to achieve a goal. It can be a sequence of actions that need to be done in a specific order to accomplish something.
- Example: If you want to bake a cake, the workflow could include steps like: gather ingredients → mix ingredients → bake cake → decorate cake.
DAG (Directed Acyclic Graph)
- A DAG is a blueprint or map of your workflow. It defines what needs to be done and in what order, but it doesn’t actually perform the tasks. It shows the dependencies between different steps.
- “Directed” means that the steps follow a specific order, while “Acyclic” indicates that the process cannot loop back to a previous step.
- Example: In the cake example, the DAG would be a chart that says you need to gather ingredients before mixing them and mix the ingredients before baking the cake.

In this DAG, A will run first, then split into two branches: one goes to B and then to D, and the other goes to C and then to E. Both branches can run independently after A finishes.
Task
- A task is a single action or step within the workflow. Each task represents a specific job that needs to be done.
- Example: In the cake workflow, tasks would be: gather ingredients (one task), mix ingredients (another task), bake cake (yet another task), and so on.
Operators in Airflow
- Operators are the building blocks of tasks in Airflow. They tell Airflow what action to perform for a task.
- Each operator defines a specific action, like running a Python script, moving data, or triggering another process.
Prominent Operators
- PythonOperator: Runs a Python function.
- Example: Executes a Python function to clean data.
- DummyOperator: Does nothing, used for testing or as a placeholder.
- Example: Marks the completion of a part of a DAG without doing anything.
- PostgresOperator : The PostgresOperator is an Airflow operator designed to run SQL commands in a PostgreSQL database.
XComs (Cross-Communications)
- XComs are a way for tasks to communicate with each other in Airflow.
- They allow one task to send data to another task.
- Example: Task A processes some data, stores the result using XCom, and Task B can retrieve that result and continue processing.
In simple terms: Operators define what your task will do, and XComs let tasks pass information to each other.
Connections
In Airflow, you use connections to manage and store the credentials and details required for connecting to external systems and services. They allow Airflow to interact with various data sources, APIs, and services securely and consistently. For example, when you create a Spark or AWS S3 connection in Airflow, you enable Airflow to interact with Spark clusters or AWS S3 buckets, respectively, through tasks defined in your DAGs.
Now that we are clear with the basic terminologies of airflow, lets start building our project !!
Installing Apache Airflow on Docker Using Dockerfile
Using Docker with Apache Airflow ensures an easy and reproducible environment setup.
Writing a Dockerfile
A Dockerfile is a script that contains a series of instructions to build a Docker image.Kindly copy these instructions into a file with the name Dockerfile.
Important : Don’t save the file as Dockerfile.txt or any other extension. Simply save as Dockerfile.
FROM apache/airflow:2.9.1-python3.9
USER root
# Install Python dependencies
COPY requirements.txt /requirements.txt
RUN pip3 install --upgrade pip
RUN pip3 install --no-cache-dir -r /requirements.txt

# Install Airflow providers
RUN pip3 install apache-airflow-providers-apache-spark apache-airflow-providers-amazon n

# Install system dependencies

RUN apt-get update && \
    apt-get install -y gcc python3-dev openjdk-17-jdk && \
    apt-get clean
We start with a base image from the official Apache Airflow repository. This ensures that we have a stable and reliable foundation for our application:
- FROM apache/airflow:2.9.1-python3.9
- The image apache/airflow:2.9.1-python3.9 includes Airflow version 2.9.1 and Python 3.9, which provides the essential tools and libraries to run Apache Airflow.
- USER root
- By switching to the root user, we gain the necessary permissions to install packages and modify the file system within the container.
- Installing Python Dependencies
- We will copy a requirements file containing the necessary Python packages into the image and install them.
- Installing Airflow Providers
- We install specific Airflow providers required for our workflows.Here for academic purposes, we have installed Provider for Apache Spark and Provider for AWS services.You can install various other providers. Prominent providers include Spark, AWS, Google, Postgres.
- Installing System Dependencies
- Finally, we install system-level dependencies that may be required by certain libraries or functionalities.
RUN apt-get update && \
    apt-get install -y gcc python3-dev openjdk-17-jdk && \
    apt-get clean
- apt-get update: Updates the package lists for the latest version of packages.
- apt-get install -y gcc python3-dev openjdk-17-jdk: Installs the GCC compiler, Python development headers, and OpenJDK 17, which may be required for building certain packages.
- apt-get clean: Cleans up the package cache to reduce the image size.
Now that we are done with setting up the Dockerfile, let’s move ahead!!
Configuring Docker Compose for Apache Airflow
In addition to creating a custom Docker image with a Dockerfile, you can easily manage and orchestrate your Docker containers using Docker Compose. The docker-compose.yml file defines the services, networks, and volumes that make up your application. We connect the Dockerfile to the Compose file so that we can build a custom image for our application and easily manage all the services it needs to run together. Let’s see how to specify our custom Dockerfile in the Docker Compose setup :
x-airflow-common
This section defines common settings for all Airflow services.
- Sets up the environment variables needed for the Airflow application to run.
- Specifies connections to a PostgreSQL database to store Airflow data.
- Defines paths for storing DAGs (Directed Acyclic Graphs), logs, and configurations.
version: '1.0'
x-airflow-common: &airflow-common
  build:
    context: .
    dockerfile: Dockerfile
  environment:
    AIRFLOW__CORE__EXECUTOR: LocalExecutor
    AIRFLOW__CORE__FERNET_KEY: ""
    AIRFLOW__CORE__DAGS_ARE_PAUSED_AT_CREATION: "true"
    AIRFLOW__DATABASE__SQL_ALCHEMY_CONN: postgresql+psycopg2://airflow:airflow@postgres/airflow
    AIRFLOW__CORE__LOAD_EXAMPLES: "false"
    AIRFLOW__API__AUTH_BACKENDS: airflow.api.auth.backend.basic_auth,airflow.api.auth.backend.session
    AIRFLOW__SCHEDULER__ENABLE_HEALTH_CHECK: "true"
    _PIP_ADDITIONAL_REQUIREMENTS: ${_PIP_ADDITIONAL_REQUIREMENTS:-}
  volumes:
    - ${AIRFLOW_PROJ_DIR:-.}/dags:/opt/airflow/dags
    - ${AIRFLOW_PROJ_DIR:-.}/logs:/opt/airflow/logs
    - ${AIRFLOW_PROJ_DIR:-.}/config:/opt/airflow/config
    - ${AIRFLOW_PROJ_DIR:-.}/plugins:/opt/airflow/plugins
    - ${AIRFLOW_PROJ_DIR:-.}/requirements.txt:/opt/airflow/requirements.txt
    - ${AIRFLOW_PROJ_DIR:-.}/sample_files:/opt/airflow/sample_files
    - ./spark_jobs:/opt/bitnami/spark_jobs
  user: ${AIRFLOW_UID:-50000}:0
  depends_on:
    postgres:
      condition: service_healthy
  networks:
    - confluent
After setting up the x-airflow-common, we need to define the services which will be required.
airflow-webserver
This service runs the web interface for Airflow, where users can manage and monitor workflows.
- Exposes port 8080 to access the web UI.
- Uses health checks to ensure that the web server is running properly.
- Depends on the database service to be healthy before starting.
services:

  airflow-webserver:
    <<: *airflow-common

    ports:
      - "8080:8080"
    depends_on:
      postgres:
        condition: service_healthy
    healthcheck:
      test: ["CMD-SHELL", "curl -f http://localhost:8080/health || exit 1"]
      interval: 30s
      timeout: 10s
      retries: 3
airflow-scheduler
The scheduler is responsible for triggering tasks based on the defined workflows.
  airflow-scheduler:
    <<: *airflow-common
    networks :
      - confluent
    depends_on:
      postgres:
        condition: service_healthy
      airflow-webserver:
        condition: service_healthy
    healthcheck:
      test: ["CMD-SHELL", "curl -f http://localhost:8080/health || exit 1"]
      interval: 30s
      timeout: 10s
      retries: 3
airflow-triggerer
This service triggers tasks that require external events or conditions to start. It runs in a similar manner to the scheduler and connects to the same PostgreSQL database.
  airflow-triggerer:
    <<: *airflow-common
    depends_on:
      postgres:
        condition: service_healthy
      airflow-init:
        condition: service_completed_successfully
    networks:
      - confluent
    command: bash -c "airflow triggerer"
    healthcheck:
      test:
        - CMD-SHELL
        - airflow jobs check --job-type TriggererJob --hostname "${HOSTNAME}"
      interval: 30s
      timeout: 10s
      retries: 5
      start_period: 30s
    restart: always
airflow-cli
This service allows command-line interface (CLI) operations on the Airflow environment. It can run various Airflow commands for debugging or management.
  airflow-cli:
    <<: *airflow-common
    depends_on:
      postgres:
        condition: service_healthy
    networks:
      - confluent
    profiles:
      - debug
    command:
      - bash
      - -c
      - airflow
airflow-init
This service initializes the database and creates the default admin user.
  airflow-init:
    <<: *airflow-common
    depends_on:
      postgres:
        condition: service_healthy
    command: >
      bash -c "
      airflow db init &&
      airflow users create \
      --username admin \
      --firstname admin \
      --lastname admin \
      --role Admin \
      --email [email protected] \
      --password admin
      "
    networks:
      - confluent
postgres
This service hosts the PostgreSQL database used by Airflow to store its metadata. We have set the username and password to connect to postgres as airflow.
  postgres:
    image: postgres:16.0
    environment:
      POSTGRES_USER: airflow
      POSTGRES_PASSWORD: airflow
      POSTGRES_DB: airflow
    logging:
      options:
        max-size: 10m
        max-file: "3"
    healthcheck:
      test:
        - CMD
        - pg_isready
        - -U
        - airflow
      interval: 10s
      retries: 5
      start_period: 5s
    restart: always
    networks:
      - confluent
networks
Defines a network for all services to communicate with each other.
All services are connected to the same confluent network, allowing them to interact seamlessly.
networks:
  confluent:
Complete docker-compose.yml
x-airflow-common: &airflow-common
  build:
    context: .
    dockerfile: Dockerfile
  environment:
    AIRFLOW__CORE__EXECUTOR: LocalExecutor
    AIRFLOW__CORE__FERNET_KEY: ""
    AIRFLOW__CORE__DAGS_ARE_PAUSED_AT_CREATION: "true"
    AIRFLOW__DATABASE__SQL_ALCHEMY_CONN: postgresql+psycopg2://airflow:airflow@postgres/airflow
    AIRFLOW__CORE__LOAD_EXAMPLES: "false"
    AIRFLOW__API__AUTH_BACKENDS: airflow.api.auth.backend.basic_auth,airflow.api.auth.backend.session
    AIRFLOW__SCHEDULER__ENABLE_HEALTH_CHECK: "true"
    _PIP_ADDITIONAL_REQUIREMENTS: ${_PIP_ADDITIONAL_REQUIREMENTS:-}
  volumes:
    - ${AIRFLOW_PROJ_DIR:-.}/dags:/opt/airflow/dags
    - ${AIRFLOW_PROJ_DIR:-.}/dags/sql:/opt/airflow/dags/sql
    - ${AIRFLOW_PROJ_DIR:-.}/logs:/opt/airflow/logs
    - ${AIRFLOW_PROJ_DIR:-.}/config:/opt/airflow/config
    - ${AIRFLOW_PROJ_DIR:-.}/plugins:/opt/airflow/plugins
    - ${AIRFLOW_PROJ_DIR:-.}/requirements.txt:/opt/airflow/requirements.txt
    - ${AIRFLOW_PROJ_DIR:-.}/sample_files:/opt/airflow/sample_files
    - ./spark_jobs:/opt/bitnami/spark_jobs
  user: ${AIRFLOW_UID:-50000}:0
  depends_on:
    postgres:
      condition: service_healthy
  networks:
    - confluent
services:

  airflow-webserver:
      <<: *airflow-common
      depends_on:
        postgres:
          condition: service_healthy
        airflow-init:
          condition: service_completed_successfully
      networks:
        - confluent
      command: bash -c "airflow webserver"
      ports:
        - 8080:8080
      healthcheck:
        test:
          - CMD
          - curl
          - --fail
          - http://localhost:8080/health
        interval: 30s
        timeout: 10s
        retries: 5
        start_period: 30s
      restart: always
  airflow-scheduler:
    <<: *airflow-common

    depends_on:
      postgres:
        condition: service_healthy
      airflow-init:
        condition: service_completed_successfully
    networks:
      - confluent
    command: bash -c "airflow scheduler"
    healthcheck:
      test:
        - CMD
        - curl
        - --fail
        - http://localhost:8974/health
      interval: 30s
      timeout: 10s
      retries: 5
      start_period: 30s
    restart: always
  airflow-triggerer:
    <<: *airflow-common

    depends_on:
      postgres:
        condition: service_healthy
      airflow-init:
        condition: service_completed_successfully
    networks:
      - confluent
    command: bash -c "airflow triggerer"
    healthcheck:
      test:
        - CMD-SHELL
        - airflow jobs check --job-type TriggererJob --hostname "${HOSTNAME}"
      interval: 30s
      timeout: 10s
      retries: 5
      start_period: 30s
    restart: always

  airflow-init:
    <<: *airflow-common

    depends_on:
      postgres:
        condition: service_healthy
    command: >
      bash -c "
      airflow db init &&
      airflow users create \
      --username admin \
      --firstname admin \
      --lastname admin \
      --role Admin \
      --email [email protected] \
      --password admin
      "
    networks:
      - confluent


  airflow-cli:
    <<: *airflow-common
    depends_on:
      postgres:
        condition: service_healthy
    networks:
      - confluent
    profiles:
      - debug
    command:
      - bash
      - -c
      - airflow
  postgres:
    image: postgres:1.0
    environment:
      POSTGRES_USER: airflow
      POSTGRES_PASSWORD: airflow
      POSTGRES_DB: airflow
    logging:
      options:
        max-size: 10m
        max-file: "3"
    healthcheck:
      test:
        - CMD
        - pg_isready
        - -U
        - airflow
      interval: 10s
      retries: 5
      start_period: 5s
    restart: always
    networks:
      - confluent
networks:
  confluent:
Guide to Project Setup and Execution
We will now look into the steps for setting up our project and execution.
Step 1: Creating a Folder
First step is to create a folder and then paste the above Dockerfile and docker-compose.yml files inside this folder.
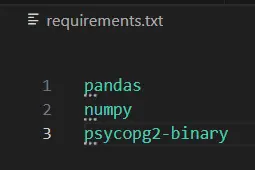
Step 2: Creating Requirement
Create a requirements.txt file and write necessary python libraries. It can include pandas, numpy etc.
Step 3: Docker Desktop
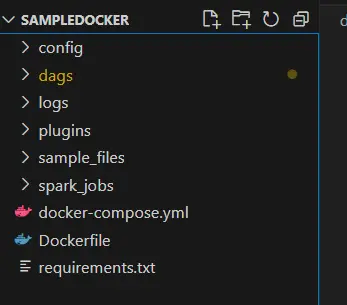
Start your Docker desktop. Then, open your terminal and write ” docker-compose up -d “.
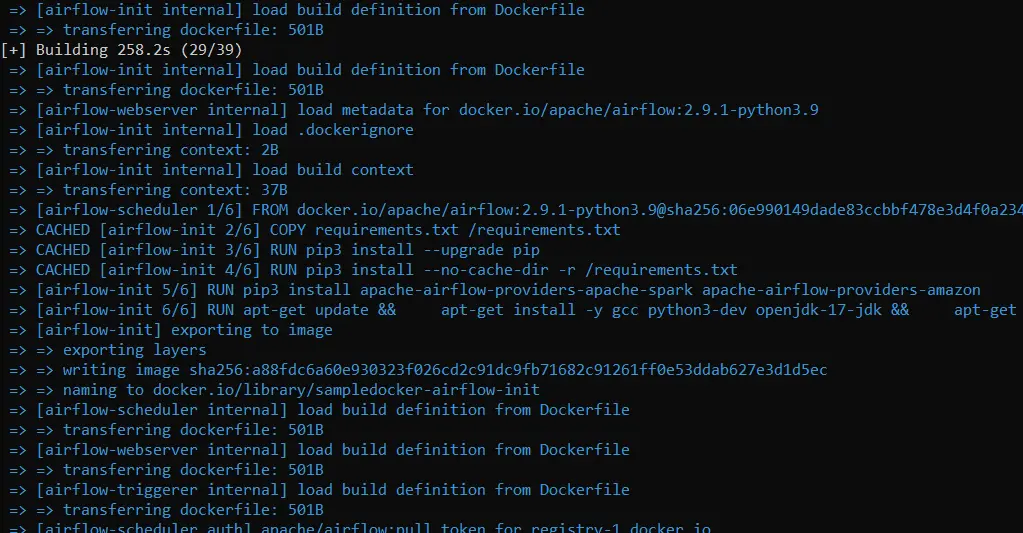
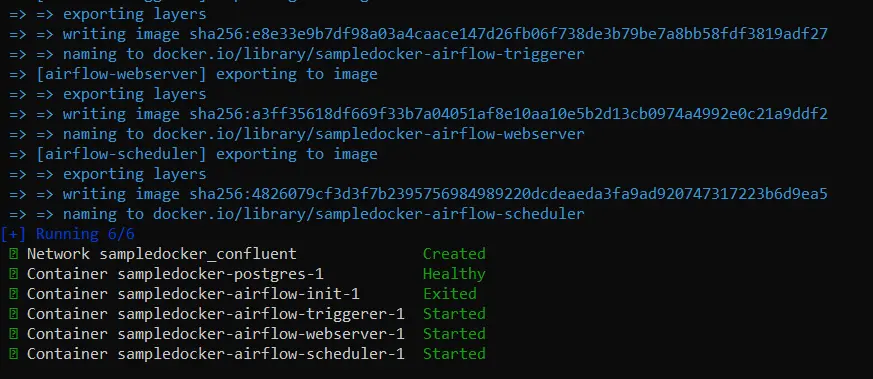
You should see something like the above images. After the command is executed successfully, you should be able to see these files :
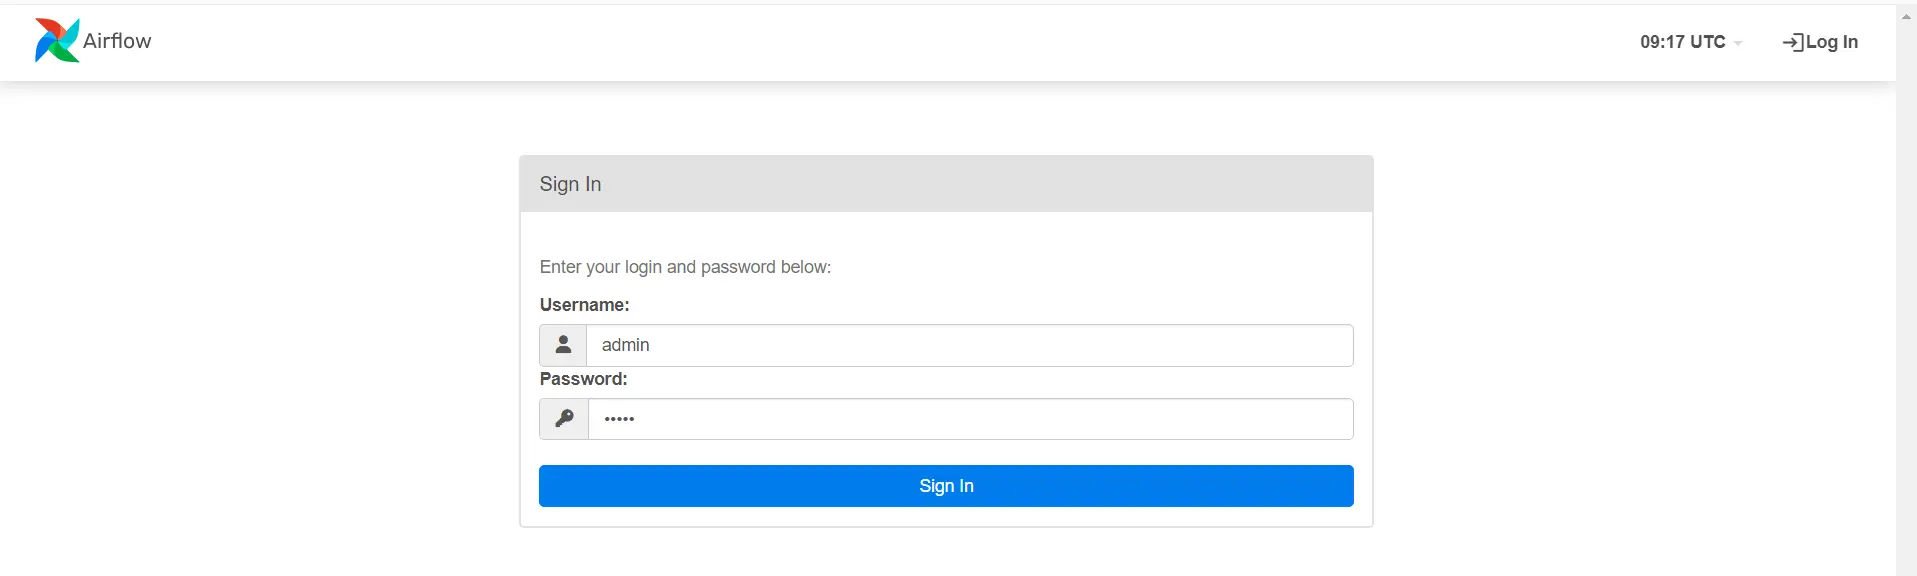
Step 4: Verify Airflow Installation
On your browser, enter this URL : http://localhost:8080. If your installation was successful, you should see:
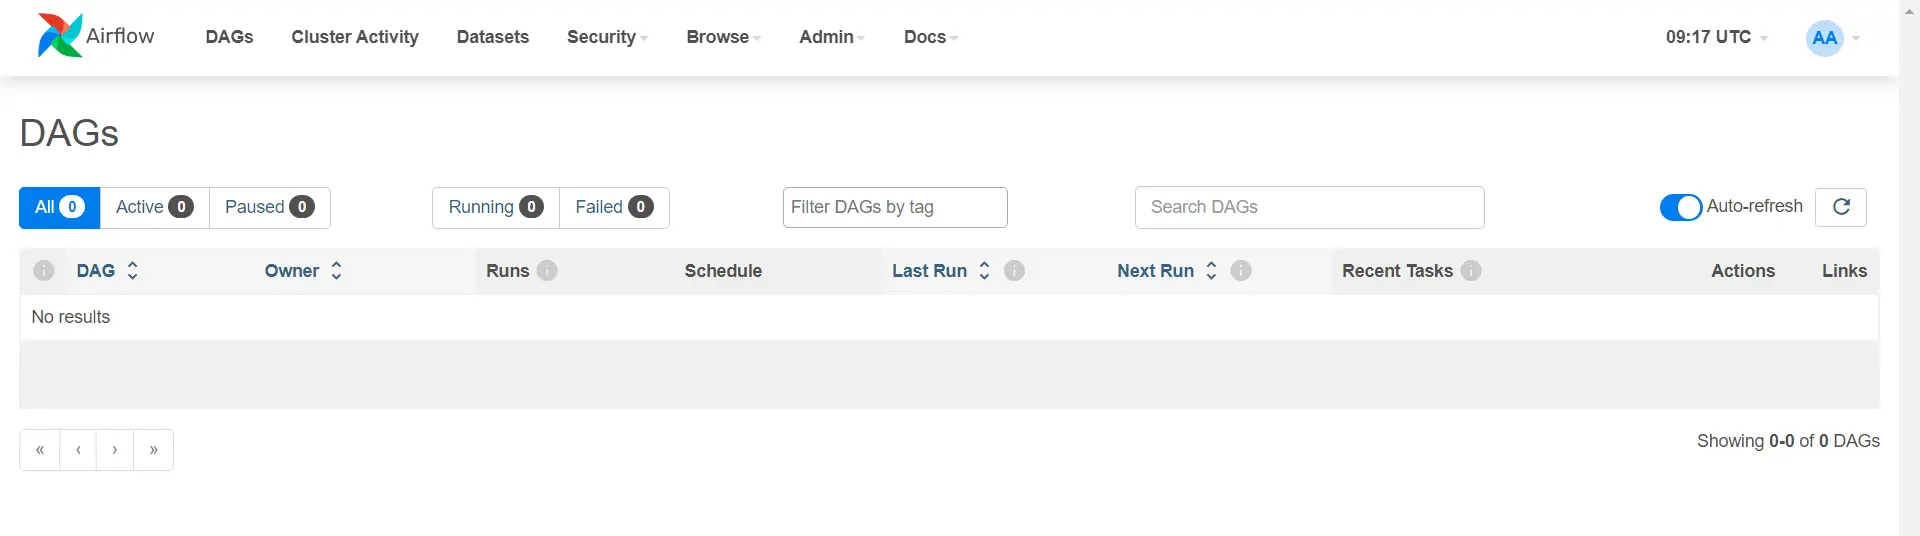
Enter your username and password as admin. After logging in, you should see :
Step 5: Connecting Postgres to Airflow
We use postgres_conn_id to specify the connection to the PostgreSQL database within Airflow. You define this connection ID in the Airflow UI, where you configure database credentials such as the host, port, username, and password.
By using postgres_conn_id, Airflow knows which database to connect to when executing SQL commands. It abstracts away the need to hard-code connection details directly in the DAG code, improving security and flexibility.
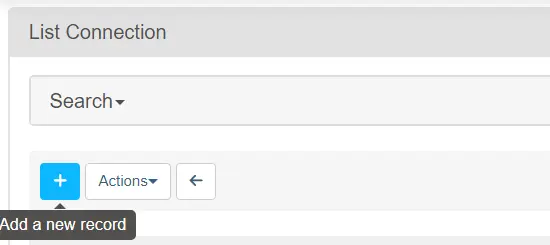
Step 5.1: On the Airflow UI, navigate to Admin>Connections

Step 5.2: Click on ‘Add a new record’
Step 5.3: Add the following parameters carefully.
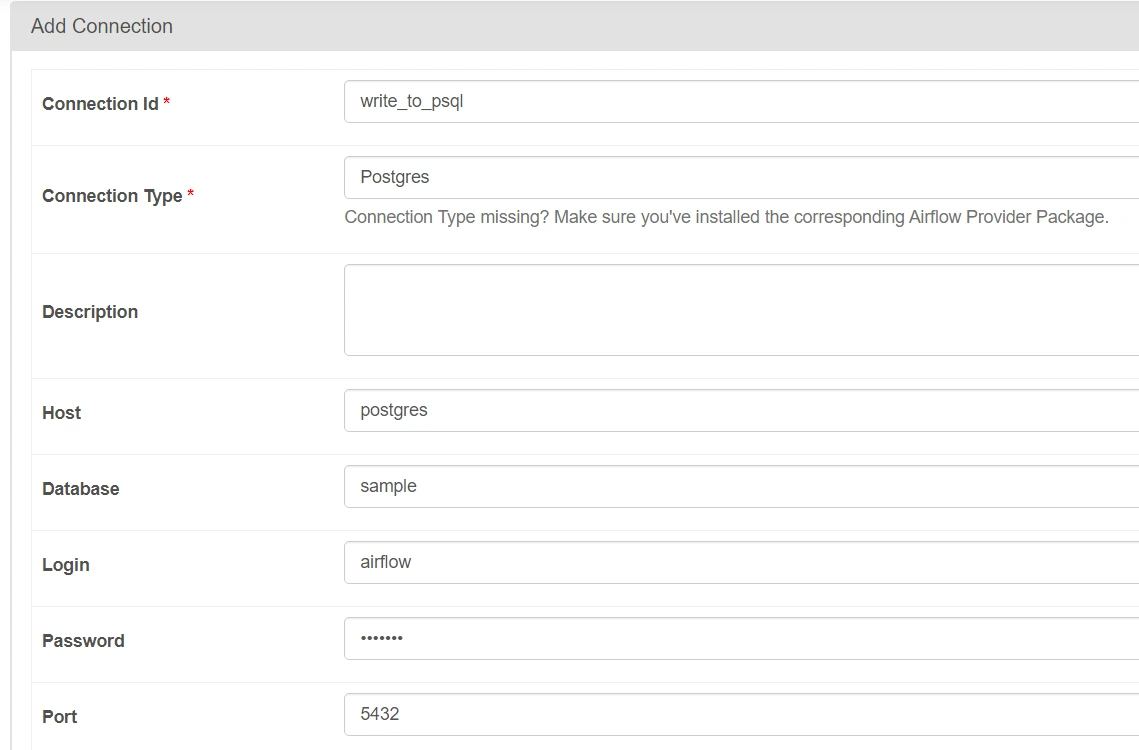
Here, we have given the basic connection parameters which will allow Airflow to connect to our postgres server configured on Docker.
NOTE : Write connection_id as ‘write_to_psql‘ properly as it will be used later. The login and password to connect to PostgreSQL are both set to airflow
Step 5.4: Preparing dummy input.csv file
Prepare a dummy input.csv file for the project. Store the file inside sample_files folder which was created.

Understanding the DAG Setup in Airflow
First, we import the necessary components: DAG (to create the workflow), PythonOperator (to run Python functions), and PostgresOperator (to interact with a PostgreSQL database). We also define default arguments like the owner of the workflow (airflow) and the start date of the tasks, ensuring the workflow begins on January 1, 2024. Finally, we import Pandas to handle data, enabling us to read CSV files efficiently.
from airflow import DAG
from airflow.operators.python import PythonOperator
from airflow.providers.postgres.operators.postgres import PostgresOperator
from datetime import datetime
import pandas as pd
# Define default arguments
default_args = {
    'owner': 'airflow',
    'start_date': datetime(2024, 1, 1),
}
Understanding generate_insert_queries() Function
This function is responsible for reading a CSV file using Pandas, then creating SQL insert queries to insert data into a PostgreSQL table. It loops through each row of the CSV, generating an SQL statement that inserts the id, name, and age values into a table. Finally, you save these queries to a file named insert_queries.sql inside the dags/sql folder, allowing Airflow to execute them later using a PostgresOperator.
# Function to read the CSV and generate insert queries
def generate_insert_queries():
    # Read the CSV file
    df = pd.read_csv(CSV_FILE_PATH)
    CSV_FILE_PATH = 'sample_files/input.csv'
    # Create a list of SQL insert queries
    insert_queries = []
    for index, row in df.iterrows():
        insert_query = f"INSERT INTO sample_table (id, name, age) VALUES ({row['id']}, '{row['name']}', {row['age']});"
        insert_queries.append(insert_query)

    # Save queries to a file for the PostgresOperator to execute
    with open('./dags/sql/insert_queries.sql', 'w') as f:
        for query in insert_queries:
            f.write(f"{query}\n")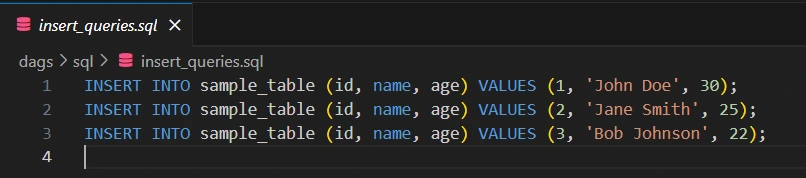
DAG Definition
This block defines the DAG (Directed Acyclic Graph), which represents the entire workflow. The parameters include:
- schedule_interval=’@once’: This specifies that the DAG should run only once.
- catchup=False: Prevents backfilling of DAG runs for missed schedules.
- default_args=default_args: Reuses default arguments like the start date for the DAG.
with DAG('csv_to_postgres_dag',
         default_args=default_args,
         schedule_interval="@once",
         catchup=False) as dag:
Task ID
Each Airflow task receives a unique task_id, which serves as its identifying name within the DAG.
For example:
task_id='create_table'PostgresOperator
The PostgresOperator allows you to run SQL commands in a PostgreSQL database using Airflow.
- task_id=’create_table’: This sets the unique identifier for the task within the DAG.
- postgres_conn_id=’write_to_psql’: Refers to the Airflow connection ID used to connect to the PostgreSQL database
- sql: Contains the SQL query that drops the table if it exists and then creates a new sample_table with id, name, and age columns.
    create_table = PostgresOperator(
        task_id='create_table',
        postgres_conn_id='write_to_psql',  # Replace with your connection ID
        sql="""
        DROP TABLE IF EXISTS sample_table;
        CREATE TABLE sample_table (
            id SERIAL PRIMARY KEY,
            name VARCHAR(50),
            age INT
        );
        """
    )
PythonOperator
The PythonOperator allows you to run Python functions as tasks. Here, it calls the generate_insert_queries function, which generates SQL queries from a CSV file.
generate_queries = PythonOperator(
    task_id='generate_insert_queries',
    python_callable=generate_insert_queries
)
PostgresOperator
- task_id=’run_insert_queries’ : A unique identifier for the task that runs the SQL insert queries.
- postgres_conn_id=’write_to_psql’: Connection ID used by Airflow to connect to the PostgreSQL database, which is pre-configured in the Airflow UI.
- sql=’sql/insert_queries.sql’: The path to the file containing SQL queries that will be executed in PostgreSQL.
    run_insert_queries = PostgresOperator(
        task_id='run_insert_queries',
        postgres_conn_id='write_to_psql',  # Define this connection in Airflow UI
        sql="sql/insert_queries.sql"
)create_table>>generate_queries>>run_insert_queriesThe line create_table >> generate_queries >> run_insert_queries establishes a sequence of task execution in Apache Airflow. It means that:
- create_table task must be completed successfully before the next task can begin.
- Once create_table is done, the generate_queries task will run.
- After generate_queries has finished executing, the run_insert_queries task will then execute.
In short, it defines a linear workflow where each task depends on the successful completion of the previous one.
Creating Python File
In your VS Code, create a Python file named sample.py inside the automatically created dags folder.
from airflow import DAG
from airflow.operators.python import PythonOperator
from airflow.providers.postgres.operators.postgres import PostgresOperator
from datetime import datetime
import pandas as pd
# Define default arguments
default_args = {
    'owner': 'airflow',
    'start_date': datetime(2024, 1, 1),
}

# Function to read the CSV and generate insert queries
def generate_insert_queries():
    CSV_FILE_PATH = 'sample_files/input.csv'
    # Read the CSV file
    df = pd.read_csv(CSV_FILE_PATH)

    # Create a list of SQL insert queries
    insert_queries = []
    for index, row in df.iterrows():
        insert_query = f"INSERT INTO sample_table (id, name, age) VALUES ({row['id']}, '{row['name']}', {row['age']});"
        insert_queries.append(insert_query)

    # Save queries to a file for the PostgresOperator to execute
    with open('./dags/sql/insert_queries.sql', 'w') as f:
        for query in insert_queries:
            f.write(f"{query}\n")


# Define the DAG
with DAG('csv_to_postgres_dag',
         default_args=default_args,
         schedule_interval="@once",
         catchup=False) as dag:

    # Task to create a PostgreSQL table
    create_table = PostgresOperator(
        task_id='create_table',
        postgres_conn_id='write_to_psql',  # Replace with your connection ID
        sql="""
        DROP TABLE IF EXISTS sample_table;
        CREATE TABLE sample_table (
            id SERIAL PRIMARY KEY,
            name VARCHAR(50),
            age INT
        );
        """
    )
    generate_queries = PythonOperator(
    task_id='generate_insert_queries',
    python_callable=generate_insert_queries
    )

    # Task to run the generated SQL queries using PostgresOperator
    run_insert_queries = PostgresOperator(
        task_id='run_insert_queries',
        postgres_conn_id='write_to_psql',  # Define this connection in Airflow UI
        sql="sql/insert_queries.sql"
    )
    create_table>>generate_queries>>run_insert_queries
    # Other tasks can follow here
NOTE: Please put the sample.py inside the dags folder only. This is because by default, airflow looks for the files inside the dags folder.
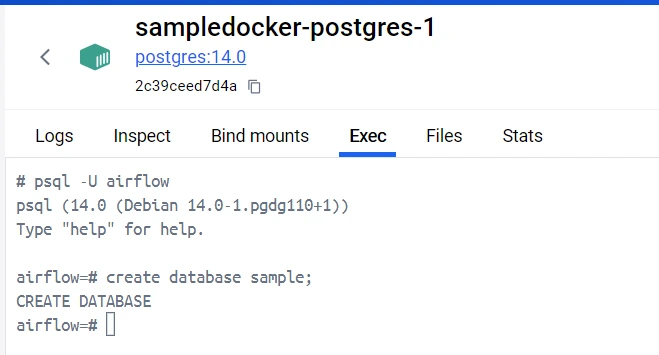
Configuring Postgres
Before running our code, we need to create a sample database inside our PostgreSQL container to write our CSV data.
On your Docker Desktop, navigate to the postgres container and go to the EXEC section. Write the following commands which will create a database called sample inside our Postgres database.
Run Your Code
Now that you’ve built the foundation of your Airflow project, it’s time to see your hard work come to fruition! Running your code is where the magic happens; you’ll witness your CSV data being transformed and seamlessly inserted into your PostgreSQL database.
- On your terminal, again write docker compose up -d. This will load up our sample.py code inside airflow.
- Go to the Airflow Home Page and click on the dag.
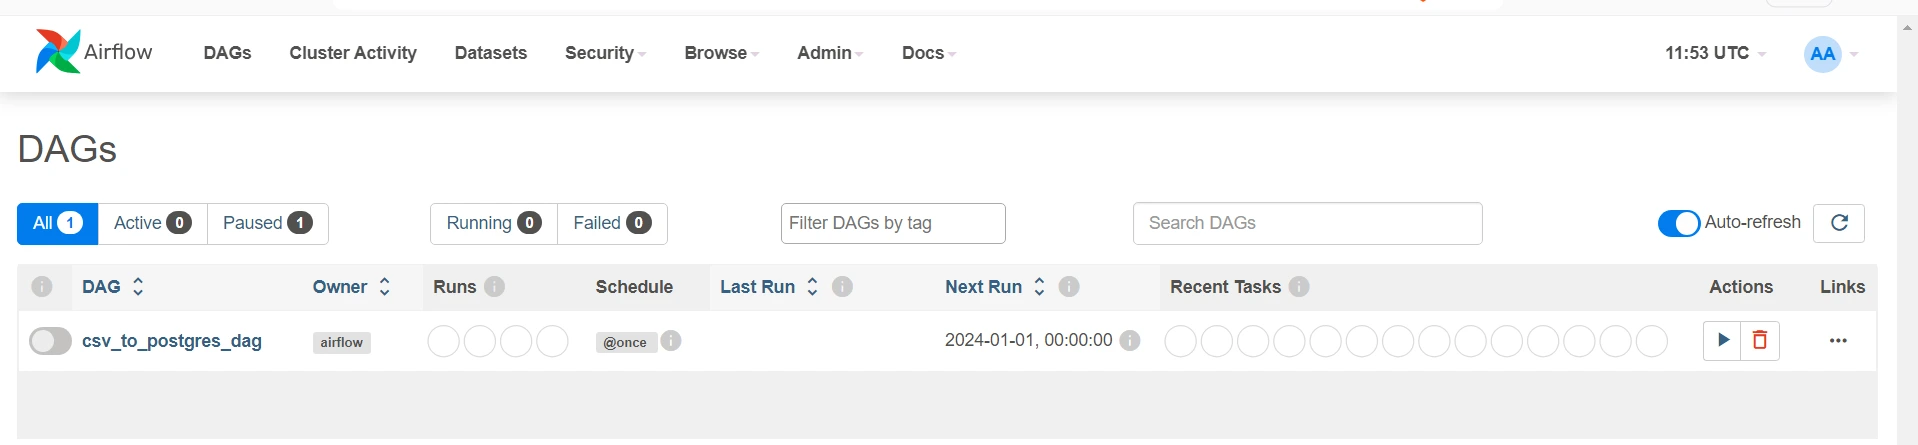
Upon clicking Graph, you can visualize your pipeline. The code section will show your latest code written in the file.
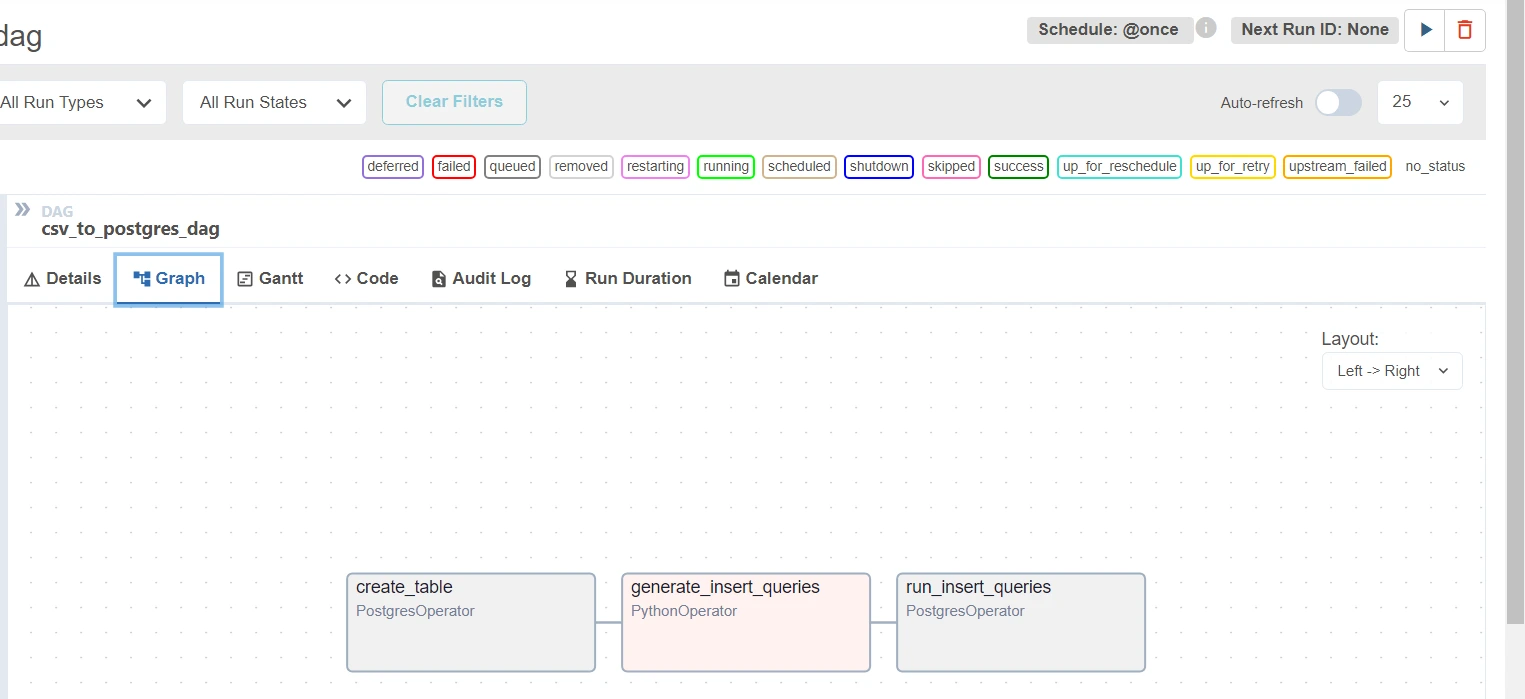
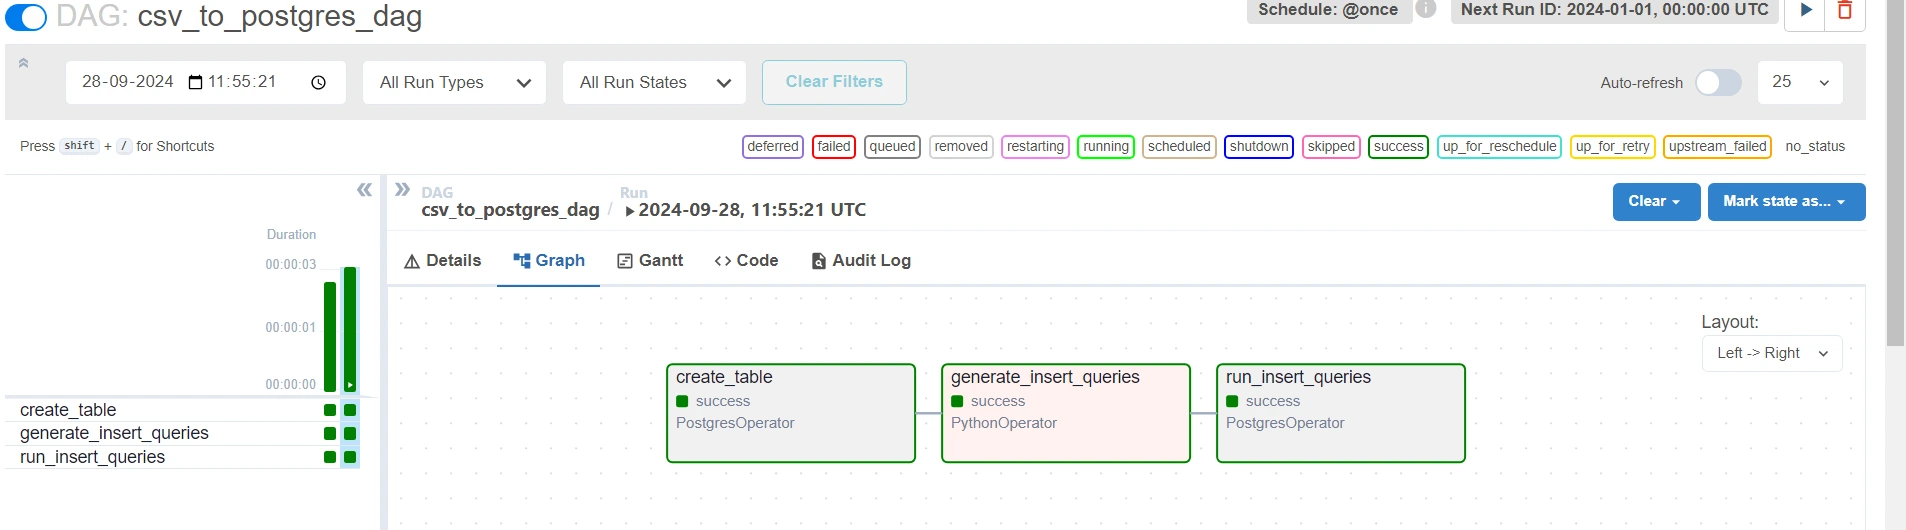
Upon clicking the play button on the upper-right corner (next to “Next Run ID: None” marker), you can run the dag. After running the dag, click on any task in the graph section to see its details. Explore to find out more.
If there were no errors, then you should see a Green color bar on the left side.
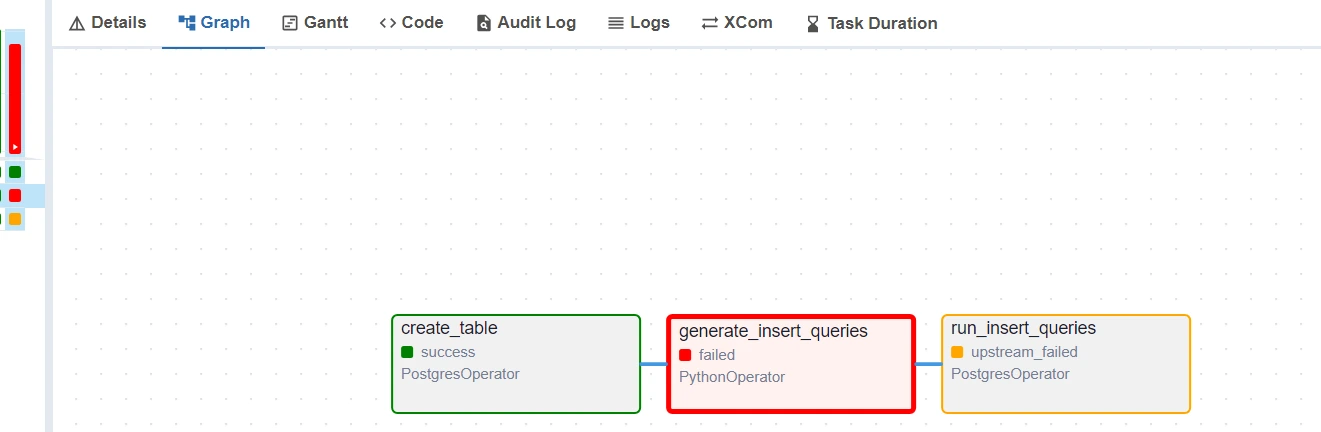
However if there are any errors, click on the task which failed and then click on the Logs to understand the error :
Conclusion
This project successfully demonstrated the integration of Airflow with PostgreSQL to automate the process of reading data from a CSV file and inserting it into a database. Throughout the project, various operators were explored and implemented for efficient data handling techniques. This project showcases the power of Airflow in automating data workflows and lays the groundwork for further exploration in data engineering.
Github Repo : Project File
Key Takeaways
- Utilizing Airflow to automate data workflows significantly enhances efficiency and reduces manual intervention in data processing tasks
- The PostgresOperator simplifies executing SQL commands, making database operations seamless within Airflow DAGs.
- Docker helps package the Airflow setup into a container, making it easy to run the same application anywhere without worrying about different environments.
Frequently Asked Questions
A. Apache Airflow allows you to programmatically author, schedule, and monitor workflows as an open-source platform. It helps automate complex data pipelines by organizing tasks into directed acyclic graphs (DAGs).
A. Docker simplifies the setup and deployment of Apache Airflow by creating isolated, reproducible environments. It ensures seamless configuration and operation of all necessary dependencies and services, such as PostgreSQL, within containers.
A. Airflow can connect to PostgreSQL using its built-in database operators. You can use these operators to execute SQL queries, manage database operations, and automate data pipelines that involve reading from or writing to PostgreSQL databases.
A. You can use Python scripts in Airflow tasks to read CSV files. The task can extract data from the CSV and, through a database operator, insert the data into PostgreSQL, automating the entire workflow.
A. Yes, Apache Airflow can scale easily. With Docker, you can run multiple worker nodes, and Airflow can distribute tasks across them. Additionally, integrating a database like PostgreSQL supports efficient handling of large-scale data.
The media shown in this article is not owned by Analytics Vidhya and is used at the Author’s discretion.

